Sunday, May 31, 2009

Snuggleville Zoo


My husband and I saw this idea in my Family Fun magazine, and we thought it was so cute that we had to build it for our son! The idea is that it is supposed to look like a cage in a zoo for all of his stuffed animals, then have extra storage on the bottom for books or other toys. We think it is a unique idea and a very cute way to store his animals when he's not playing with them. :)

What you need:
3 tier shelving unit (we made our own)
3/4-inch-wide elastic for the "bars" (about 6 to 8 feet worth, or as much as you think you'll need for your shelving)
12 to 15 finish washers
12 to 15 one-inch wood screws (we used No. 8's)
Drill

What to do:
Along the shelves' edges, mark spots to attach the elastic bars, spacing them between 5 and 10 inches apart. With a drill, make pilot holes to match your screws. 

Measure the height of the zoo enclosure, then cut strips of elastic that are 1-1/2 inches shorter than the enclosure (you want to stretch the elastic when you attach it to the shelving to make it tighter). 

Find the middle of the elastic, then (with 2 pairs of hands) hold the middle part of the elastic tight on the middle shelf and attach it using the drill with the wood screw and washer. Once the middle part is attached, you can then stretch the remaining elastic above and below to make it taut. Then, attach it the same way on the top shelf, and the bottom shelf. Do this for the rest of the elastic strips until they are all attached. Alternatively, you can secure the top and the bottom of the elastic first, then secure the middle. 

Share/Save/Bookmark

Friday, May 29, 2009

Fruity Couscous


I got the idea for this recipe from my Cooking For Baby cookbook (see April 2nd post), but changed it up a little bit, as usual. My son LOVED it and kept saying, "Mmmm Mmm!". I figured he would since it has fruit in it, and that is always a hit with him! He has had couscous before, but I wasn't sure how he would like the texture of Israeli couscous, since it is a little bigger than regular couscous. I guess I had nothing to worry about! If you haven't tried couscous before, it is a great substitute for rice with your meals. It isn't a grain, but a pasta made from semolina wheat. I think it is delicious mixed with almost anything! Here, I mixed it with Golden Raisins and Pear puree. You can use any fruit you like. I thought about using some of my dried peaches or dried cranberries too... maybe next time! :) Enjoy! 

Ingredients:
1/4 cup golden raisins (any dried fruit would be fine)
1/4 cup pear puree (any fruit would be fine)
1 tbsp unsalted butter
1/2 tsp salt
1/4 tsp ground cinnamon
1/4 tsp cumin
1 tbsp agave nectar
1 cup Israeli couscous (regular couscous would be fine too, just not as creamy)

In a saucepan over medium-high heat, combine 1-1/4 cups water with raisins, butter, salt, cinnamon and cumin, and bring to a boil. Stir in couscous, reduce heat to low, and simmer for 3 minutes. Add pear puree and stir to combine. Remove from heat, cover and let stand 5 minutes. Give a final stir, then serve. Makes about 4 cups. 

Share/Save/Bookmark

Wednesday, May 27, 2009

Nature's Path Oatmeal

I normally like to make my own oatmeal for my son. I get some old-fashioned rolled oats, cook them over the stove, and add my own mix-ins. Then I have to wait for my oatmeal concoction to cool to room temp before I can feed my son... When I have a busy morning, or need to get my family out the door early in the morning, it's instant oatmeal to the rescue! I LOVE these instant oatmeal packets from Nature's Path! I purchased mine at Whole Foods, but they might be available at other stores. They come in many different flavors and they are delicious! My husband and son love them! Since they are organic and have other great healthy ingredients, I don't feel so bad giving them to my son for a quick breakfast. I usually still like to mix in a little more fruit with this oatmeal (I almost always have extra fruit cubes in the freezer or a banana on hand). This particular variety has blueberries and flaxseed in it, which is great for an extra boost of Omega-3 (and of course the antioxidants from the blueberries)! Yum! By the way, these also make a great breakfast or snack to have with you in the hotel when you're traveling! :)
Share/Save/Bookmark

Monday, May 25, 2009

Sunflower/Daisy Carrot Cake


I have a sunflower bundt cake pan that I have rarely used, but I had the perfect occasion... My mom's birthday! :) I decided to make her favorite... Carrot cake! I even made my own frosting (I like to call it "Cheesy Frosting")! And I decorated the cake to look more like a daisy, since they are her favorite flowers. As usual, I found a recipe online, then adjusted it based on what I had available and what I wanted to add/take away from it. Some carrot cakes call for nuts and raisins, and I didn't want to add those to this cake. Also, I wanted to add pineapple since I had some on hand, and I wanted to substitute some of the flour with whole wheat flour. So, here's what I came up with... It turned out very moist and delicious! My mom (and my son) LOVED it! :)

Ingredients:
for the cake--
2 cups granulated sugar
2/3 cup canola oil
3 eggs, room temperature
1 tsp vanilla extract
2/3 cup applesauce*
1-1/2 cups all-purpose flour
1 cup whole wheat flour
2 tsp cinnamon
2 tsp baking soda
1-1/2 tsp salt
1 pound carrots, grated
1/2 cup pineapple, crushed or chopped

Preheat oven to 350 F. Grease and flour sunflower cake pan, or 2 (8-inch) round cake pans. 

Beat sugar, oil, eggs, and applesauce together until combined using an electric mixer with paddle attachment. Add the vanilla. 

In a separate bowl, sift together flour, cinnamon, baking soda and salt. Add the dry ingredients to the wet ingredients. Fold in the carrots and pineapple, mix well. 

Pour batter in sunflower cake pan, or divide equally between 2 (8-inch) round cake pans. Bake for 55 to 60 minutes*, or until a toothpick comes out clean. Decorate as desired with frosting (see recipe below).

*Note: The use of the applesauce cuts the amount of oil in the recipe in half. I used my stash of homemade applesauce. If you use store-bought applesauce, it might have added sugar, so you may need to decrease the amount of sugar in your recipe. My sunflower cake pan is a darker color, and per the Nordicware website, I was told to decrease the temperature by 25 degrees. I ended up baking it for 1 hour and 25 minutes! This might have also been because it was one big 10-cup capacity cake pan.. so it may take less time if you have the temp at 350 F and use 2 smaller cake pans... :)

Ingredients:
for the Cheesy Frosting--
15 oz ricotta cheese (you can use part-skim)
1/2 cup cheesecake flavor cream cheese* (regular or neufchatel should be fine too)
1/4 cup (1/2 stick) unsalted butter, softened
1/3 cup plus 2 tbsp powdered sugar
1 tbsp honey
1 tbsp milk
1/2 tsp orange zest
1/4 cup fresh squeezed orange juice
1/2 tsp vanilla

Blend cheeses and butter together until smooth. Add sugar, honey, milk, orange juice and vanilla until combined. Fold in orange zest. After I piped the white frosting, I used a little yellow food coloring to make the inside of the "daisy" yellow. I piped the petal frosting using a #16 tip, and the inside "dots" using a #2 tip. I also had some extra orange zest that I added to the inside of the "daisy"... It kind of looks like pollen... :)

*Note: I LOVE cheesecake flavor cream cheese! It also makes a great snack spread on graham crackers... tastes just like cheesecake! So far, I have only been able to find it at Walmart, but check your local grocery store... You may have better luck than me. :)

Share/Save/Bookmark

Saturday, May 23, 2009

Tofu Bites

Okay, these are one of my super-easy go-to snacks for my son. They are delicious, somewhat nutritious, and a great finger food for toddlers! I use a firm tofu because it has more protein than medium or soft ("silken") tofu. But, you can use any tofu you like. Most tofu slices really easily and you should be able to make little cubes with any of them. Tofu is high in protein, calcium, iron and magnesium. When I can't get my son to eat his meat, I reach for the tofu! :)

Ingredients:
1 block firm tofu, cut into cubes
2 graham crackers, crushed into crumbs
2 tbsp wheat germ

I usually grind the graham crackers and wheat germ together in the food processor. Then I pour the crumb mixture onto a plate and roll the tofu cubes around in it to coat. Or, you could pour the crumb mixture into a plastic sandwich bag with the cubes, then shake them around to coat with the crumbs. You could also add some spices... cinnamon or nutmeg would be great added to the crumb mixture! Enjoy! :)

Share/Save/Bookmark

Thursday, May 21, 2009

Three-Meat Meatloaf with Sun-Dried Tomatoes

Wow! My husband and I were in San Francisco when we stopped at some diner and had a delicious meatloaf. It was a chilly day, so the warm meatloaf and mashed potatoes really hit the spot that day. When we came back home to AZ, I had to find a recipe that was similar. So I searched online and found one, and I have been using this recipe for a few years (with some of my own special touches). As I was feeling exceptionally creative the other day, I decided to change it up and hopefully improve it... Oh my goodness! This was delicious! My husband and I loved it! Meatloaf is not very photogenic, but it sure does taste good! :) Enjoy!

Ingredients:
1/4 cup olive oil
1-1/2 cups onions, finely chopped
1/2 cup celery, finely chopped
2 tbsp garlic, minced
1 tbsp dry Italian seasoning, crushed
1 pound ground beef
1 pound Italian sausage, casings removed
12 oz Chorizo, casings removed
1/2 cup sun-dried tomatoes packed in oil, drained and coarsely chopped
1/2 cup cilantro, finely chopped
2 eggs, beaten
1/2 cup Panko bread crumbs (regular or Italian bread crumbs are fine)
Pepper as desired
1/4 to 1/2 cup sun-dried tomato spread (as needed to cover the loaf)

In a large skillet, warm olive oil over medium heat. Add onions, celery, garlic, and Italian seasoning. Cover and cook, stirring occasionally, for 10 minutes. Remove from heat and cool to room temperature. 

Preheat oven to 350 F. In a large bowl, mix together ground beef, sausage, chorizo, onion mixture, sun-dried tomatoes, cilantro, eggs, bread crumbs, and pepper. Transfer meat mixture to a large but shallow baking dish and shape it into a flat loaf about 2-1/2 inches thick. There will be a large amount of mixture at this point. You may also use a loaf pan if desired. Smooth the top of the loaf with the back of a spoon. Spread sun-dried tomato spread on top of loaf, coating evenly.

Bake about 1-1/2 hours, or until an instant-read thermometer inserted into the center of the loaf registers 165 F. Let rest on a rack for 10 minutes before slicing. Add more sun-dried tomato spread atop your loaf as desired. Serve hot with mashed potatoes and veggies. Serves 6 to 8. 

Share/Save/Bookmark

Wednesday, May 20, 2009

Journal Makeover...


I first made a journal like this a few years back at a stamp party I went to. I thought it was such a cute idea! I've made many of these little journals! I think it is a great gift idea for anyone, and it is easy to do! I'm sure your kids could help (or even make their own) as well! I have made some for other people as a regular journal, a Grandma journal, or as a baby shower journal. I also made some for myself as fancier school notebooks! It is relatively inexpensive too, but looks so nice when its finished! And because you make it yourself, it is a gift that everyone will love! 

What you need:
*Composition notebook
*At least 4 sheets (8-1/2 by 11-inch) colored or patterned paper, or make decorations on simple white paper using stamps or stickers. You can use scraps for extra decorations (i.e., for the label, border, etc.)
*Ribbon (I like to use ribbon either as an added decoration or as a bookmark. Mine was about 12 inches long)
*Stickers (optional)
*Craft glue stick

What to do:
Make measurements of the exact amount of paper you'll need. Place your notebook on the paper (long-ways) and line up the edge of the paper with the edge of the black binding of the notebook, then flip the notebook over making sure the paper stays lined up with it. With a pencil, trace on the paper along the outside of the notebook (be sure to trace the side of the paper that won't be seen on the outside of the notebook). Do this for all four sheets of paper, for each side of the notebook (front cover, inside front cover, inside back cover, and back cover). To make it as even as possible you will have to trace each paper, since the shape will vary some for each cover. Once you have your paper traced and cut out, begin attaching it to your notebook. Take your glue stick and spread glue all over the front cover, then attach your front cover paper to the front. If you are using ribbon as a bookmark, attach it to the inside of the back cover (using glue stick) before you attach the back cover paper. Glue only a couple of inches of ribbon to the inside back cover. It will be more secure once you attach the paper on top. Attach the remaining covers with your glue stick. If you don't like the look of the black binding on the notebook, you can cover it up by gluing some scrap paper over it, making an edge/border type thing. See mine above... I have dotted paper, but my border was striped paper to cover up the black binding. You won't be able to cover the entire thing since it curves, but it will look a little nicer at least. You can add a little "label" on the front. I did the generic "My Journal", but you can be more personal and call it "Jennifer's Journal", or "Grandma's Journal", "Travel Journal", whatever you want. It doesn't even have to be a journal... it could be a recipe keeper, memory book, school notebook... you decide! :) I like to put random stickers or stamps  throughout the notebook in the corners of the pages as an extra decorative touch. If you're giving this as a gift, it is also nice to write a little something on the first page to the recipient. Enjoy making this crafty gift! :)

Share/Save/Bookmark

Monday, May 18, 2009

Veggie-Fruit Smoothie

Although my son has been getting better at eating his veggies, sometimes I like to mix them in other things that I know he will eat (or drink, in this case). Of course, he loved this smoothie just as much as the other one, and my husband and I enjoyed it too! I have been on a smoothie kick because it is so hot here in AZ already! I get up in the morning and I am craving something cool to drink. Plus, this is such an easy recipe for a snack any time of day!  I saw a recipe for carrot-ginger smoothies in a magazine that I was reading, and it gave me inspiration for this recipe... although my recipe is quite different. I didn't have carrot juice or ginger root, but I had leftover frozen carrot and sweet potato purees, so I thought I'd use them up. Both carrots and sweet potatoes (the red kind) are naturally sweet and are loaded with Vitamin A and Beta Carotene. My son loves them as a finger food too. If you like, you can use all carrot, or all sweet potato and it would probably taste fine. I was just using up my frozen cubes. You can also use any kind of fruit you like. I had some strawberries and bananas on hand (Vitamin C and Potassium). I used whole milk yogurt and whole milk since this was for my son, but you can certainly use skim or reduced fat, or even soy if you are making this for yourself. :) I added some wheat germ for a protein boost. These were a little thick, so if you like your smoothies thinner, you can use more milk. Also, if you want yours to be more of a "slushy" texture, you can add some ice, or use frozen fruits or veggies. 

Ingredients:
2 tbsp carrot puree
2 tbsp sweet potato puree
1/2 cup strawberries, chopped
1/2 cup banana (about 1 medium), sliced
1/2 cup milk
1/2 cup vanilla yogurt
2 tbsp wheat germ

Blend all ingredients in a blender until smooth. Or if you have an immersion blender, put all ingredients in cylinder container, then blend with immersion blender until smooth. Makes about 2-1/2 cups. Serve and enjoy! 

Share/Save/Bookmark

Sunday, May 17, 2009

Create-A-Sticker


I got this sticker-making device a long time ago at Michael's, but I'm pretty sure they still sell it, or something like it (or something even better). You can also check any craft or hobby store. If not, you can check out the Xyron website. I LOVE being able to make my own stickers! And, I'm sure kids would love to make their own stickers too! This one is really easy to use. Once you have the sticker cartridge in, you create your own sticker (color and cut out a fun paper shape with a cute saying or anything you want), then insert your paper, pull the "tape" through, rub it down a little and tear off the excess tape. Then peel the sticky part to reveal your stickers! You could use this to make name tags, small labels, decorations for a scrapbook, etc... The possibilities are endless! :) I use mine now for little things here and there, but I originally bought it so I could make decorative stickers for my wedding favors (all 200 of them!). It worked perfectly! 

Share/Save/Bookmark

Saturday, May 16, 2009

Mini Frittatas


These make a delicious and healthy breakfast! I have seen similar recipes for frittatas on multiple websites, but I do mine a little different. These ones are easy to make, and you can use a muffin tin to make mini frittatas, which are the perfect size for little hands (cuts down on cooking time too)! I use a regular sized muffin tin, and just fill them up halfway with my egg mixture, but you can also use a mini-muffin tin for bite-sized frittatas. You can use any vegetable you like (or what you have on hand). I like to use a green veggie with tomatoes. Not only do you get protein from the eggs, you also get iron from the green veggie and vitamin C from the tomatoes, which helps your body absorb the iron. I normally add a little dash of garlic powder for extra flavor, but I forgot this time. My son LOVED them, even without the extra flavor! I love when he nods his little head while saying, "Mmmm mmm!" :) These little frittatas also make a great hors d'oeuvre for a breakfast or brunch party! 

Ingredients:
3 eggs
2 tbsp milk
2 tbsp shredded cheddar cheese (any cheese would be fine)
1/4 cup Chinese Broccoli, steamed and chopped (regular broccoli or other greens, like spinach or asparagus would be great too)
1/4 cup Italian style tomatoes, drained and diced (I like to blot them with a paper towel to absorb some of the moisture so the eggs aren't so "liquidy")
Season to taste with salt, pepper, and/or herbs and spices

Preheat oven to 375 F. Whisk eggs and milk together until combined. Add the remaining ingredients and stir until equally distributed. Spray a muffin tin with non-stick spray. Use a small spoon or measuring cup to pour the egg mixture into the muffin cups, filling only halfway. Bake for 12 to 14 minutes or until the egg mixture is firm in the middle. My mixture made 9 mini frittatas. You can double or triple the recipe to make more, if you like. Enjoy!

Share/Save/Bookmark

Friday, May 15, 2009

Reusable Grocery Bags

Okay, maybe this is a silly post... But, I LOVE my reusable grocery bags! And I feel so good when I use them because I know I'm helping the environment at least a little bit! I got these for Mother's Day, and was thrilled! It's funny the things that make me happy... ;) I had hinted to my husband many times that I wanted to start using reusables, and he finally took the hint! Now I've got him hooked! These bags are so spacious too! I am sure we would use at least twice (if not three times) the amount of plastic bags for one reusable bag! My husband got mine at Whole Foods since I LOVE shopping there! He even got me a fancy insulated one for our cold (or hot) stuff, which will definitely help in this AZ heat! I know there are some cheaper ones out there, so please make the switch! It really will help! Also, many stores will give you 5 cents off your receipt per bag you use when you checkout! I'm still researching this, but so far I know that Whole Foods, Sprouts, and Fry's will give you the discount. Every little bit helps! :)
Share/Save/Bookmark

Thursday, May 14, 2009

Quinoa Muffins


I found this recipe in an old Everyday Food magazine that my mom gave me. I saw the words "quinoa" and "muffin" and I knew I had to try it! I was so excited to try this recipe because I LOVE giving my son quinoa (pronounced "keen-wa")! It is actually a seed that is treated as a grain. You can also use it instead of rice, couscous, or other grains with your meals as a side dish and it is sooo good for you! It is high in protein and essential amino acids, making it a complete protein source. It is also high in fiber, B vitamins, magnesium, phosphorus, and iron, and it is gluten-free. You might be able to find quinoa in your regular supermarket. I had better luck at Whole Foods or Sprouts, but I think Trader Joe's may carry it as well. Look for it in the grains section. I changed up my recipe based on what I had available. The original recipe calls for raisins, but I used dried peaches instead. You can use any dried fruit you like. It wasn't overly sweet, but it was good enough for my son, and he's the best critic I have! :) Enjoy!

Ingredients:
1 cup quinoa, rinsed
1/4 cup vegetable oil, plus more for pan
2 cups flour, plus more for pan
3/4 cup packed brown sugar
1-1/2 tsp baking powder
1 tsp salt
1/2 cup dried peaches, chopped
3/4 cup milk
1 large egg
1 tsp vanilla extract

Preheat oven to 350 F. In a medium saucepan, bring quinoa and 1 cup water to a boil. Reduce to a simmer; cover and cook until water has been absorbed and quinoa is tender, 11 to 13 minutes. 

Meanwhile, brush a standard 12-cup muffin pan with oil; dust with flour, tapping out excess. In a medium bowl, whisk together flour, sugar, baking powder, salt, peaches, and 2 cups cooked quinoa. Reserve any leftover quinoa for another use. 

In a small bowl, whisk together oil, milk, egg, and vanilla. Add milk mixture to flour mixture and stir just until combined. Divide batter among prepared muffin cups. 

Bake until a toothpick inserted in center of muffin comes out clean, 25 to 30 minutes. Cool muffins in pan, 5 minutes. Transfer to a wire rack to cool completely. Serve and enjoy! 

Share/Save/Bookmark

Tuesday, May 12, 2009

Fruit Smoothie

I wanted to make something quick, healthy and yummy for an easy mid-morning snack. And, since the weather is nice and warm here in AZ, a smoothie was sounding really good! My son LOVED this smoothie! Every time he took a sip, he'd say, "Mmmm, mmmm!". It was so cute! I tasted it and was wishing I had made more for me! I just used some fruits I had on hand, but I added a little wheat germ for some extra protein and folic acid. Because I made this for my son, I used a mix of whole milk and whole milk yogurt. But, if you are making this for yourself, you can lighten it up by using reduced fat or skim milk, and reduced fat yogurt. You could also add some tofu to this recipe to give it a bigger boost of protein! If you want your smoothie to be more of a slushy, use frozen fruit, or add some ice before blending. Enjoy! :)

Ingredients: 
1/2 cup vanilla yogurt
1/2 cup milk
1 tbsp wheat germ
1/4 cup strawberries, diced
1/4 cup mango, diced
1 banana, chopped

Blend all ingredients together in a blender until smooth and creamy! Serve and enjoy!

Share/Save/Bookmark

Monday, May 11, 2009

Tortilla Soup


I found this recipe for Tortilla Soup in my 101 Things to Do with a Slow Cooker cookbook, but I adjusted it a little based on what I had available, and things I wanted to add to my soup. :) My husband loves corn, so I had to add it to this soup, along with a couple of other special ingredients. It is starting to get kind of hot for soup right now, so I probably won't make this again until winter. :) If you like a lot of heat, you can increase the spicy-ness by adding extra chili powder, red pepper flake, or hot sauce to this. I prefer a milder heat. :)

Ingredients:
2 boneless skinless chicken breasts, diced
1 tbsp minced garlic
1 can (14 oz) chicken broth
1 can (14 oz) diced tomatoes, with liquid (I used the Italian kind)
1 can (4 oz) diced green chiles
1 can (14 oz) whole kernel corn, drained
1 cup salsa (mild or medium)
1 handful fresh cilantro, finely chopped
1/2 tbsp ground cumin
1/4 tsp chili powder
Salt and pepper to taste
2 flour or corn tortillas, cut into 1/2-inch strips
Cheese, shredded

Spray inside of Slow Cooker with non-stick spray. Add all ingredients except tortillas and cheese to the Slow Cooker. Cook on high for 4 to 6 hours. About 10 to 20 minutes before serving, make the tortilla strips. Spray a baking sheet with non-stick spray and spread tortilla strips evenly on the tray. Bake at 300 F for 15 to 20 min or until crisp. Pour soup into bowls, then add shredded cheese and tortilla strips on top. Makes 4 to 6 servings. Enjoy! :) 

Share/Save/Bookmark

Sunday, May 10, 2009

Handprint Lillies

I LOVE this idea! I found it in my Family Fun magazine, and I thought it would be a cute thing to do with my son for him to give to his Grandma for Mother's Day. I did mine a little different than how the magazine said to do it, just based on what I had available. It was pretty easy to do, and I think they look just as cute! :) I put most of this craft together, since my son is only 18 months old, but older kids could probably do the whole thing themselves with a little guidance! :) 

What you'll need:
Scissors
White Card Stock Paper*
Green Card Stock Paper*
Green Straws
Yellow Spoon Straws*
Tape
(You can make as many as you like)

*Note: I used Construction Paper and I think it worked fine. They say to use a thicker paper because it keeps its shape better. Family Fun's version used yellow pipe cleaners for the stamen of the lilly. They folded the pipe cleaner in half, then curled down the ends. Check out their version of this craft here. I used yellow spoon straws instead of pipe cleaners because that's all I had on hand. I think either way looks fine. 

What to do:
First, you need a handprint. Borrow your child's hand for a little bit, and trace around their hand, or if you have older kids, they can trace their own hands. If you want to make multiple flowers, you can trace a bunch of hands on one piece of paper if you have a tolerant child, or just trace one hand, cut it out, then use it as a template to trace more handprints. :) Then, draw some paper "leaves", making sure to leave a little "stem" so you can attach the leaves to the straw. Once you have all your "templates" cut out (hands and leaves), start assembling the stem and stamen of the lilly. If you are using yellow spoon straws, cut the straw until it is a good length for the stamen of your lilly (this will depend on how big your child's hand is...). Then, fold the end of the straw (the non-spoon end), and tuck it into the green straw (stem straw). It should stay in there without having to secure it with tape. Next, take your handprint lilly and using a pen or pencil, curl the fingers back just until they look a little curly. Curl the leaves the same way. Then, fold the "lilly" around the "stem", making sure the "stamen" sticks out. Secure the lilly with tape (glue would probably work too, but would take longer to dry). Then attach your leaves underneath the lilly on the "stem", securing them with tape. Your Handprint Lillies are done! :) Enjoy!

Share/Save/Bookmark

Saturday, May 9, 2009

Chicken Salad Mini Pitas


I originally made these mini pitas with my son in mind, but he hasn't been very fond of meats right now... So my husband and I gobbled them down! :) They are pretty easy to make, and they are a great little snack or hors d'oeuvre to serve at your next lunch or dinner party. You can easily serve this in a normal-sized pita, maybe with some crunchy lettuce! I just had the mini pitas on hand for my son. :)

Ingredients:
1 boneless skinless chicken breast, cooked and shredded
Pita bread
2 tbsp light mayo
1 tbsp lemon juice
Zest of 1 lemon
1 tsp honey
1 tbsp fresh dill, chopped
Salt and pepper to taste

Combine mayo, lemon zest, lemon juice, honey, dill, salt and pepper in a medium bowl. Add chicken and stir to coat. Stuff into pita pockets, and enjoy! :) 

Share/Save/Bookmark

Friday, May 8, 2009

Blueberry Corn Muffins


My son and my husband LOVE these corn muffins! When I'm in a hurry, I like to use the Jiffy corn bread mix because its so much easier, but I wanted to make some homemade blueberry corn muffins, so I searched for a recipe online. I found one, and adjusted it a little bit. They turned out great! :) These are another great little snack for kids of all ages, and they are pretty healthy too, with a boost of Omega 3 from the flaxseed meal. Hardly any sugar in them! Enjoy! :)

Ingredients:

1 cup all-purpose flour
3/4 cup yellow corn meal
1/4 cup sugar
1-1/2 tsp baking powder
1/2 tsp baking soda
1/2 tsp salt
1 tbsp flaxseed meal
1 large egg
3/4 cup milk
Zest of 1 lemon
Juice of 1 lemon
1/4 cup unsalted butter, melted and cooled
1-1/2 cups fresh or frozen blueberries, rinsed and well drained

Preheat oven to 425 F. Spray a 12-cup muffin tin with non-stick spray. 

Mix all dry ingredients together in a medium mixing bowl. In a large mixing bowl or stand-mixer, beat egg, lemon zest, lemon juice, and milk together until smooth. Stir in the melted butter. Add three-fourths of the flour mixture to the egg mixture, stirring until just moistened. Toss blueberries with the remaining flour mixture, making sure they are coated. Fold blueberry mixture into batter. Using a small scoop, pour batter into prepared muffin tin. Bake 20 to 25 minutes* until muffins are lightly browned. Cool then serve, or eat them hot! :) Makes 12 muffins. 

*Note: My muffins took exactly 20 minutes, so keep an eye on yours. You may want to set your timer for less time, then check on them until they are done. :)

Share/Save/Bookmark

Thursday, May 7, 2009

1st Anniversary Paper Roses

Okay, so I didn't actually make these for my husband for our 1st anniversary. I didn't think of the "anniversary rose" idea until our 2nd anniversary. But, I wanted to post this idea in chronological order starting with the 1st anniversary! So, I just made these paper roses today. I had seen ideas like this online, and thought, "Why should I have to pay someone else to do something that I could easily do myself?" The ones I had seen online used regular paper, which is not as easy to work with as tissue paper! And silly me, I started trying this craft with regular paper from my printer and kept getting frustrated until I glanced to the left of my desk and saw a big stack of tissue paper sitting there! Duh...! Then, as I started making these paper roses, I reminisced on my childhood school days when we made tissue paper flowers for Cinco de Mayo...  Anyways, I LOVE giving gifts from the traditional and/or the modern gift list for anniversaries! That's why I started making roses (for the easier anniversaries... I obviously can't make a crystal rose!). These paper roses are pretty easy to make, and they are a cute way to say "I love you" to your significant other on your special day! :) Your kids can help with this project too! 

What you'll need:
Green Plant Stakes (for the stem)
Green Floral Tape
Tissue Paper (any color is fine... well, maybe not black..)
Scissors
Silk Leaves (optional... I didn't have any on hand)

What to do:
First, make your "roses". Cut a medium strip of tissue paper in a wavy pattern, then start rolling it up loosely to form a rose shape. As you roll it up, hold the bottom of the paper (about 1/2-inch), and pinch it together so that the rose will stay together and keep its shape. When you're done making your rose, you should have a small "stem" of paper at the bottom. This will make it easier to attach to your plant stake. Take your rose stem and attach it to the plant stake using floral tape. Just hold the "stem" and the stake between your fingers, then start wrapping the tape down and around the stake until the rose is secure. If you would like to add leaves, make sure they have a stem on them, then add the leaf stem to the stake as you are winding your floral tape down. Be sure to only wrap up the stem of the leaf and not the leaf itself. :) When everything is taped and secure, you have made your Paper Roses! Enjoy!

Share/Save/Bookmark

Wednesday, May 6, 2009

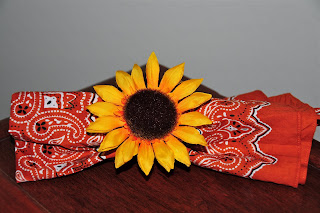
Sunflower Napkin Rings


I LOVE Sunflowers! They are such a happy flower! :) I made these napkin rings for Thanksgiving one year when we hosted, but they can be used any time of year! They were easy to make and not very expensive either. The "ring" part is a plastic shower curtain hook, which I found works great as a napkin ring. Obviously, you can use any flower you like, but bigger flowers will work better. 

What you'll need:
Glue gun and glue sticks (if you don't have a glue gun, tacky glue might work too)
Silk sunflowers (I bought the kind that came in a bunch... about 3 to 6 flowers per bunch)
Ribbon*, 1/2-inch wide (any color you like)
Plastic shower curtain hooks (you can buy a pack of 10 for less than $2 at Target)

*Note: The ribbon is optional. I wrapped my rings with the ribbon to make them look a little fancier. I used the wire edge ribbon because it wraps around the ring tighter, but any ribbon should be fine as long as it is secured tightly with glue on both ends. 

What to do:
First, make sure the shower curtain hook is fastened. If you are using 1/2-inch wide ribbon, you'll need about 20 inches of ribbon per ring. Starting at the top of the shower curtain hook, dab a dot of hot glue near the edge of the hook, then press ribbon to the glue to attach it to the shower curtain hook. When it is dried and secured, start wrapping the ribbon around the "ring" until covered, overlapping the ribbon just a little bit so the ring doesn't show through. When you get to the other end of the hook, dab another dot of hot glue near the edge and press the ribbon to the glue to secure the end tightly. 

If you bought a "bunch" of flowers, remove just the flower portion from the stem. You should be able to see from the picture what I mean here. Place a dab of hot glue onto the "stub" bottom of the flower, then attach it to the shower curtain hook near the actual "hook" area. Let glue dry. Now you have some pretty napkin rings for your next dinner party! :)

Share/Save/Bookmark

Tuesday, May 5, 2009

Dried-Peach Oatcakes


I found a similar recipe in my "Cooking For Baby" cookbook, but changed it up a bit. I wanted to find an easy snack to make for my son. These turned out okay. They are not very sweet, but my son seems to like them okay. I might try changing the recipe a little the next time I try making these. You can use any dried fruit you want. I happened to have some delicious dried peaches on hand, so I used them in my recipe. If you want to sweeten the oatcakes up more, you can add more honey, use some agave nectar, or add vanilla to this recipe. The recipe in my cookbook calls for coconut, which I am not a fan of, so I omitted it from my recipe. If you like coconut, by all means add it to your recipe. It might even make these oatcakes a little sweeter. :)

Ingredients:

2 cups old-fashioned rolled oats
1/2 tsp ground cinnamon
1/2 tsp baking soda
1/8 tsp salt
2 tbsp unsalted butter, melted
1 tbsp honey*
3 tbsp dried peaches*, finely chopped
2 tbsp unsweetened coconut*, finely shredded
1 cup hot water

Preheat oven to 400 F. Line 2 baking sheets with aluminum foil and spray with non-stick spray. 

In a mixing bowl, combine oats, cinnamon, baking soda, and salt. Make a well in the center and add the butter and honey. Combine with a rubber spatula until all oats are coated. Mix in peaches and coconut (if using). Heat water in a teakettle or saucepan until very hot, but not boiling. Add hot water 2 tablespoonfuls at a time to oat mixture, stirring after each addition with a rubber spatula, until oats become wet and sticky. You will not need to use all of the water. With wet hands, mix oat dough a final time. Dough will be sticky and loose. 

Using 2 large spoons, scoop and drop dough onto prepared baking sheets. With wet fingertips, shape dough into 2-inch round, flat oatcakes.

Bake oatcakes until edges turn golden brown and centers are firm and not sticky, about 15 minutes*. Transfer to a wire rack to cool completely. The oatcakes will crisp while cooling. Makes 15 to 18 oatcakes.

*Note: Any dried fruit would be fine to use in this recipe. Coconut is optional. If you want these a little sweeter, add extra honey (or agave nectar, or vanilla). I baked my oatcakes for 13 minutes, and I think that was too long. Next time I make these, I will try 10 minutes first, then add minutes as needed until oatcakes are golden brown. :) Enjoy! 

Share/Save/Bookmark

Monday, May 4, 2009

Applesauce


As you may have noticed from my previous posts of things I feed to my son, I don't like to give him a lot of sugary things. I like to find more natural ways of sweetening his foods. So, I make my own applesauce for him instead of buying the store bought sugary ones. Good apples are sweet enough as it is! My son LOVES this applesauce, plain or mixed in with something else (oatmeal, pancakes, muffins, etc.). I think this is a pretty simple recipe, since there are only 2 ingredients. It does take a little extra time, but it is so worth it! If you don't give your baby any spices yet, you can omit the cinnamon. It will still be yummy! 

Ingredients: 
4 apples, cored and quartered (any kind is fine. I prefer Gala)
1/2 tsp ground cinnamon

Bring 1 inch water to a boil in a medium to large pot with a steamer basket. Place prepared apples in the steamer basket. Cover and cook until apples are fork tender. Cool until you are able to handle them with your hands.* Peel skins, or otherwise remove flesh from the apples. Place in food processor and add cinnamon. Puree or chop to desired consistency. Serve and enjoy! Makes about 1.5 cups. Freezes great! 

*Note: If you're in a hurry, after the apples are done cooking, I like to put them in some ice water to help them cool faster. They are much easier to handle when they're nice and cool! :) 

Share/Save/Bookmark

Sunday, May 3, 2009

Sweet Potato-Banana Pancakes


I think I make WAY too many pancakes! Here's another recipe if you need some more variety in your pancake breakfasts! ;) My son LOVES these just as much as all the other ones I make, although I'm sure he would love them even if I made them plain! :) These ones contain two of his favorites... Sweet potatoes and bananas! I personally love the texture of these... smooth and fluffy. I think maybe its because of the sweet potatoes. I added a little extra stuff for flavor and nutrition... I think orange goes well with sweet potatoes, and I love adding Flaxseed Meal for a boost of Omega 3! Enjoy!

Ingredients:
3/4 cup Arrowhead Mills Pancake Mix
1/2 cup plus 2 tbsp milk
1 tbsp Canola Oil
1 tbsp Agave Nectar
2 tbsp Orange Juice (if you want more orange flavor, use some orange zest in addition to the juice)
1 tbsp Flaxseed Meal
1/4 cup Sweet Potato Puree
1 medium banana, sliced or pureed

Mix all ingredients together until well blended and lumps disappear. Cook on preheated (375 F-400 F) lightly oiled griddle or pan, turning when bubbles form on surface and edges begin to dry. Cook for another minute or so until done. Serve and enjoy!

*Note: I'm sure these would be delicious with some maple syrup if you're a fan! My son still likes them plain, and they're easier for him to eat that way too! :) For thicker pancakes, use less liquid; for thinner pancakes, use more liquid. 

Share/Save/Bookmark

Saturday, May 2, 2009

Good Night Our World Books


My son and I LOVE this book! We got back from a trip to the Carolinas the other day, and we found this book in a gift shop in Charleston, SC. Good Night Charleston is part of a series of books by Mark Jasper and Cooper Kelly. It has a cute little story and great illustrations of some of the places we visited while in Charleston. I didn't realize there was such a large series of them until I looked up the website on the back of the book. There are many different cities and states, as well as some different places families tend to visit such as the zoo, the beach, the lake, etc.! I am excited to add to my son's collection! As you know from my other book posts, I LOVE books that teach kids about different places or cultures, and these books definitely fit this category! You might be able to find these books in your local bookstore, in some gift shops of the cities you visit, at Amazon, or the publisher's website. I think you and your children will love them! :)

Share/Save/Bookmark

Friday, May 1, 2009

Oatmeal with Pumpkin and Banana


My son LOVES oatmeal! And it makes me so happy because it's so good for him too! Oats are an excellent source of thiamine, iron, and dietary fiber. I like using the rolled oats usually, but all I had in my pantry was the quick oats, which are also fine to use. You can heat the oatmeal over the stove top or in the microwave per package directions, and it's pretty quick and easy to make. I just like to add "extras" for my son, to make it more delicious! 

Ingredients:
1 cup water
1/2 cup quick cooking oatmeal
1 banana, sliced or mashed
2 tbsps pumpkin puree
1 tsp cinnamon
1 tsp agave nectar

Cook the oatmeal per package directions. My son was super hungry, so I did mine in the microwave. Mix 1 cup water with 1/2 cup oats, then microwave for 1.5 minutes. When it is done, mix in bananas, pumpkin, cinnamon, and agave nectar. Stir, serve and enjoy! :) Makes about 2 cups.

Share/Save/Bookmark